3.2 KiB
Readme
This is the version 0.1 of scientific-emacs. This respositry contains the Dockerfiles to build the images for Redis and Emacs.
Installation
To install the Docker System first refer to the Docker Installation Guide. After test docker run hello-world.
Then, you are redy clone this repository within your working directory using:
$ git clone http://gmarx.jumpingcrab.com:8088/mice-rs101/scientific-emacs
Then, it is possible to build the scientifc-emacs container by:
$ docker build -t scientific-emacs:0.1 docker/emacs/
Run the container to test it:
docker run --rm -it gmarxcc/scientific-emacs:0.1`
and run an Ubuntu command like ls
Done, you are doing great!
Executing emacs
On Macos
To get the ip address ''' open -a xquartz ip=$(ifconfig en0 | grep inet | awk '$1=="inet" {print $2}') xhost + $ip '''
To run the container
docker run --rm -it  -v`pwd`/emacs-config:/root \
            -e DISPLAY=$ip:0 \
            -v /tmp/.X11-unix:/tmp/.X11-unix \
            gmarxcc/scientific-emacs:0.1
the 'emacs-config' folder contains the '.emacs' configuration file
On windows
Open VcXsrv
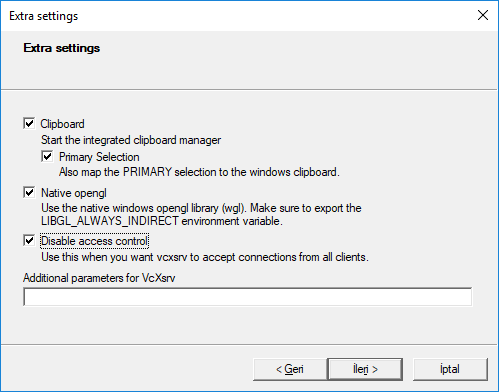
Firts open or install VcXsrv Windows X Server. When VcXsrv Windows X Server is open make sure to have selected as follow the extra settings. Check all options as below and finish configuration.
Get your ip adress
Get your IP address using ipconfig command at the PowerShell:
PS C:\Users\gmarx> ipconfig

......

Wireless LAN adapter Wi-Fi:

   Connection-specific DNS Suffix  . : rga.ip
   IPv6 Address. . . . . . . . . . . : 2806:103e:5:e64e:d01:9a10:1ba8:8577
   Temporary IPv6 Address. . . . . . : 2806:103e:5:e64e:44a7:4800:cc9a:7a3c
   Link-local IPv6 Address . . . . . : fe80::d01:9a10:1ba8:8577%2
   IPv4 Address. . . . . . . . . . . : 192.168.1.77
   Subnet Mask . . . . . . . . . . . : 255.255.255.0
   Default Gateway . . . . . . . . . : fe80::1%2
                                       192.168.1.254
**remember to use a physical adapter activaded, it means whit an IP address, in my case is Wi-Fi adapter IPv4 192.168.1.77.
Now you can go to the folder of this repository and run the container using the next commands:
PS C:\Users\gmarx>cd scientific-emacs
PS C:\Users\gmarx\scientific-emacs> $ docker run --rm -it -v ${PWD}/data:/data -v ${PWD}/config/:/root -e DISPLAY=192.168.1.77:0.0 scientific-emacs:0.1
root@d442a76cd169:/#
this means that you are already have mounted the 'scientific-emacs:0.1' image.
Copy this code to run the container more easily:
docker run --rm -it -v ${PWD}/data:/data \
-v ${PWD}/config/:/root \
-e DISPLAY=your.ip:0.0 \
scientific-emacs:0.1
What is installed on the repository
The repository has previously installed
- aspell:
- curl:
- auctex:
- pdftools:
- oh-my-zshell:
How to run pyhton scripts
After first run the container
Upgrade texlive to be able to install new packages by :
''' apt-get upgrade texlive-base '''
Then, init the user with 'tlmgr init-usertree'. After that you can install new packages using 'tlmgr install package'.

